Stay Up to Date with Calendar
Calendar appears much the same on the surface, with subtle changes to fonts and layouts giving it that Yosemite look. But this workhorse app has received some helpful extras—like intelligent auto-completion, an updated Day view, and overlay calendars—that can make keeping track of your schedule easier ①.
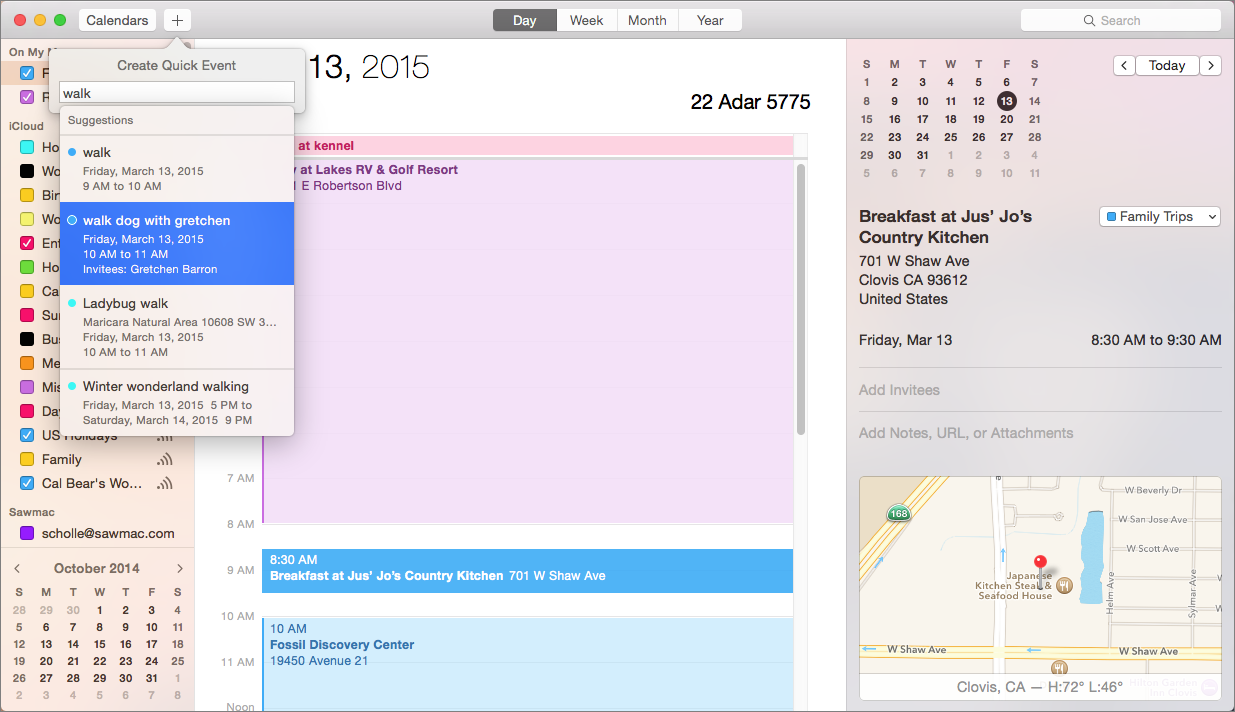
① Yosemite’s Calendar revamps the Day view to make it easier to see and change event details. Calendar also makes autocompletion suggestions that draw intelligently from your other events.
Save Time with Intelligent Autocomplete
Whether you’re looking forward to the annual Coulterville Coyote Howl or just made an appointment for the ziplines in Mariposa, using Calendar begins with creating an event:
- Double-click a day and then enter a description and duration.
- Control-click a day and choose New Event in the contextual menu.
- In Day or Week view, click and drag from the event’s start to its ending.
- Click the Add
 button at the top left and use natural language to describe your event (
Spooky Bingo with Dave Saturday at 5 PM).
It’s what happens after you add an event that’s changed: As you begin typing in the event’s title, a drop-down menu appears with predictions based on past events.
Say you often create a Walk dog with Gretchen event at 10:30 AM. Double-click on next Friday and type walk dog. A drop-down menu appears with the suggestion Walk dog with Gretchen at 10:30 AM. Select this; the event is created and Gretchen invited.
When you use the Add  button, the drop-down menu includes past and future events that might be related ②. Select one to jump to it in the calendar.
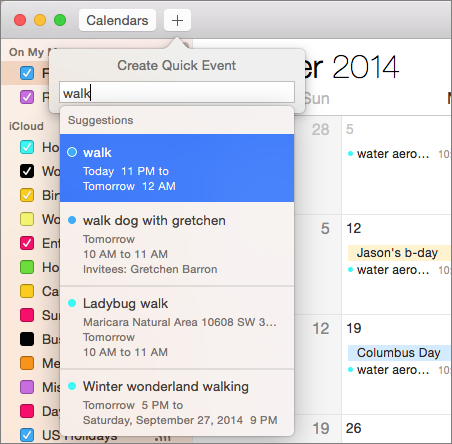
② Calendar speeds up the process of adding new events by offering suggestions based on your other events.
Enter Events Quickly with the New Day View
Veteran Calendar users who like to work in Day view grew accustomed to the teeny tiny popover where they had to enter details for an event.
Thankfully, Yosemite makes Calendar’s Day view more useable. The two-panel view now gives you the day’s schedule to the left, and details about a selected event in an inspector to the right ③. Add or edit information right in the inspector pane.
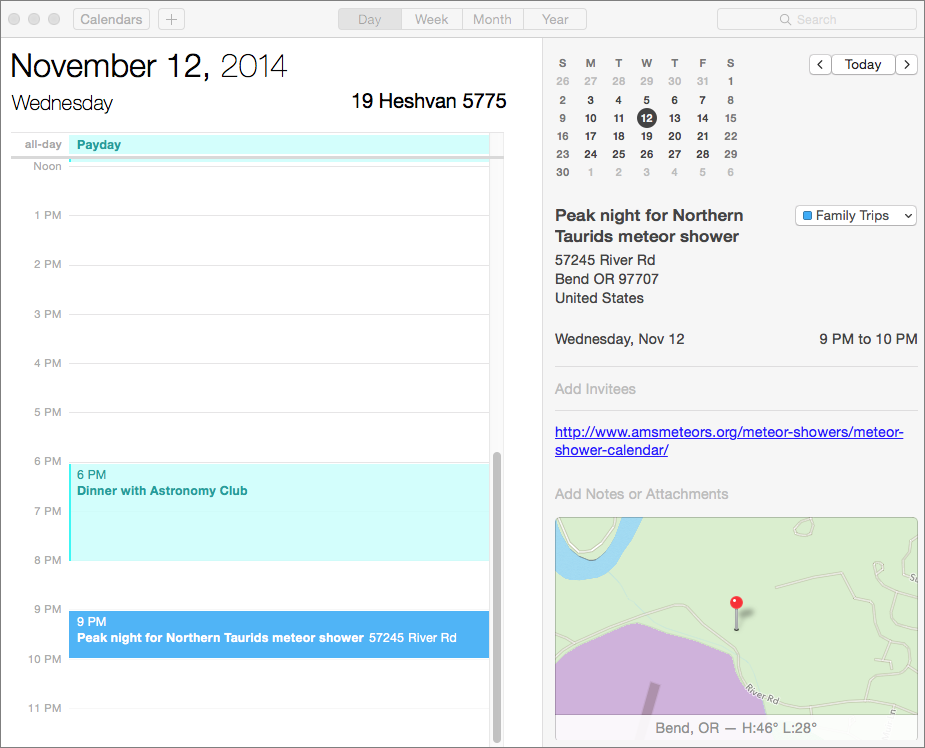
③ The reimagined Day view now shows event details in an inspector pane on the right, making them easier to enter and see.
Add a Location
When you type the address for an appointment in the location field, Calendar automatically creates a miniature map that can include an estimate of the travel time to your destination. Click this to jump straight to the Maps app for directions.
Calendar can even suggest nearby restaurants. Type a general description in the Location field, like pizza, and a drop-down menu appears with local matches ④. (For the record, Spotlight’s advice is more detailed and includes Yelp reviews.)
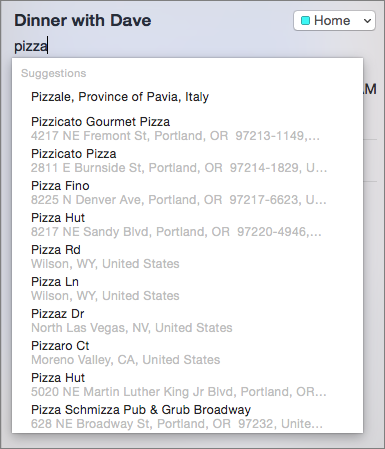
④ Calendar offers nearby restaurant suggestions if you type a term in the Location field.
Reschedule an Event
Alas, alack—the ziplines are booked! To reschedule an event:
- Double-click the event and adjust the date or time in the popover.
- Drag the event to another day or time.
- In Day view, click the event and change details in the inspector pane.
Remove an Event
Select the event and then press Delete.
Make Events Reoccur
Calendar handles reoccurring events with ease, whether it’s a weekly ukulele jam or monthly book club meeting:
- Double-click an event and then click Add Alert, Repeat or Travel Time.
- Click the repeat amount and choose an interval—from Every Day to Every Year.
Or for less conventional reoccurrences, choose Custom. Say your ukulele jam happens every third Thursday. Click the Frequency pop-up menu and choose Weekly. Then fill in the field so the sentence reads: Every 3 Week(s) On. Finally click Thursday’s T and then click OK ⑤.
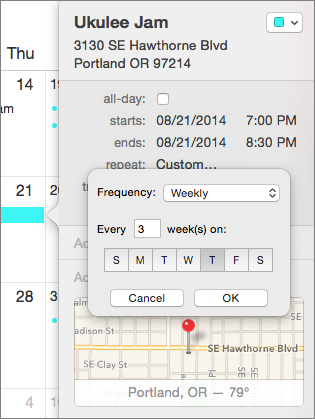
⑤ Set up more complex reoccurring events using Calendar’s Custom option.
- Stop the event after a certain number of times or on a date, using the End Repeat pop-up menu.
Set an Alert
Double-click an event and then click Edit. Choose a time—At Time of the Event, 5 Minutes Before, and so on—from the Alert pop-up menu. You can set more than one alert; click the Plus button beside the Alert pop-up menu.
It’s easy to miss the fact that Calendar lets you remind yourself in a lot of different ways. Choose Custom at the bottom of the Alert menu to see:
- Message: At the appointed time a notification displays onscreen.
- Message with Sound: A notification displays and makes a sound.
- Email: Calendar sends you a reminder email message.
- Open File: Here’s where you can get creative. At the appointed time, the file you choose—an MP3, an email message, a work file, an Automator workflow—opens. Choose Other to select the file. And yes, that does mean you could greet the end of each workweek with a classic from Loverboy or Rebecca Black.
To remove an alert (second thoughts about Rebecca Black?), choose None from the Alert pop-up menu.
Set Up a Calendar Account
Set up Calendar to use an Internet account such as iCloud or Google and you’ll be able to view the same calendars on all of your devices. That means if you change an event or accept an invitation on your iPhone, the event updates everywhere.
If you use an iCloud account to log in to your computer, you probably signed in to Calendar, too. (If not, go to System Preferences > iCloud, sign in with your Apple ID, and then check the box next to Calendars.)
To add another Internet account, choose Calendar > Add Account, select the account type, and then enter your information ⑥.
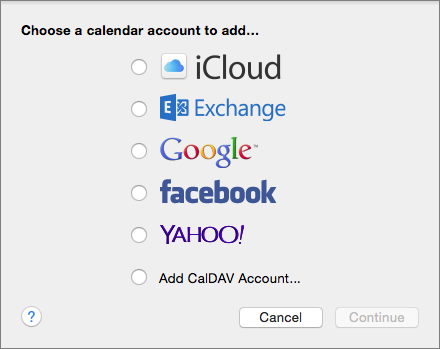
⑥ Set up Calendar to use an Internet account and you’ll be able to see those calendars on all your devices.
To disable an account, choose Calendar > Preferences, click Accounts, select an account, and then uncheck the box next to Enable This Account. To delete a calendar account, Choose Calendar > Preferences, and then click Accounts. Select the calendar account, and then click the minus button.
The Calendar app groups together all the calendars associated with an account in the calendars list.
View Your Calendars List
If you can’t see a calendar list at the left ⑦, click the Calendars button (or choose View > Show Calendar List). You’ll see a mini month view below it.
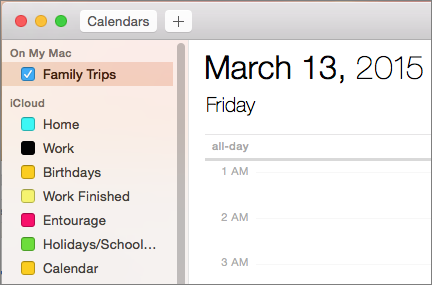
⑦ The calendars list shows all your calendars, grouped by account type. Check or uncheck the box beside one to show or hide its events.
Show or Hide a Calendar
Working in the calendars list, select or deselect its colored checkbox in the calendar list . To change a calendar’s color or name, select it in the calendars list, and then choose Edit > Get Info.
Add a Calendar
By default, Yosemite includes two calendars with the Calendar app, Work, and Home. Go to Calendar > Preferences > General and select Turn on Birthdays Calendar and Turn on Holidays Calendar to add holidays based on your region and birthdays entered in the Contacts app.
You may want to create others to keep track of your activities. To do this, choose File > New Calendar and choose On My Mac (to store it locally) or choose an account, for instance, iCloud. In the case of iCloud, Mail creates a new, synced calendar that you can see on all your Apple devices.
Delete a Calendar
If you are sure you want to remove a calendar and all its events, Control-click (or right-click) its name in the Calendars list, and then choose Delete from the contextual menu that appears.
Add an Overlay Calendar
A new—and very easy to overlook—Yosemite feature is the option to display a Lunar Calendar Overlay, which means you can see the Chinese, Hebrew, or Islamic lunar calendar alongside the Gregorian equivalent.
Choose Calendar > Preferences, click General, and select Show Alternate Calendar. Choose the lunar calendar you want from the pop-up menu.
The first day of a month in the lunar year is designated by a thick red line ⑧.
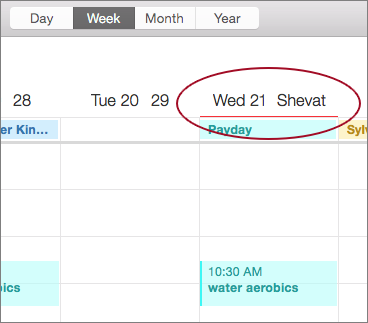
⑧ Yosemite’s new overlay calendars let you keep an eye on a lunar calendar, too. Here, you see the first day of Hebrew calendar month Shevat (circled).
Copyright © 2014, Sawyer McFarland Editing. All rights reserved.


 button at the top left and use natural language to describe your event (
 button, the drop-down menu includes past and future events that might be related ②. Select one to jump to it in the calendar.


